How To Configure Webmail In Android Smartphone
Here is the simeple configuration of webmail service in your smartphone to avoid the entering url in mobile browser to check the mails and send and receive operation.
1.Click on Email Icon in the smartphone.
2.Welcome to email screen will appear. Here enter the your email address along with the domain name and enter the password.
example: Enter your email address : test@mytecharticle.com
Password: XXXXXX
3.Select MANUAL SETUP for further steps.
4.Now Select the Imcoming mail server. For webmail access need to select POP3 or IMAP . Most of the users prefer to use POP3 is the incoming mail server.In our case we are using IMAP for incoming mail server.

5. In Next window appear with the incoming mail server configuration.
Username: complete username along with the domain name (ex: test@mytecharticle.com)
Password: xxxxxxxx
Server : mail.domainname (ex: mail.mytecharticle.com)
Port: for IMAP 143 for POP3 110
Security Type : Based of mail providers. For default port numbers secuity type NOne
IMAP path prefix: Optional
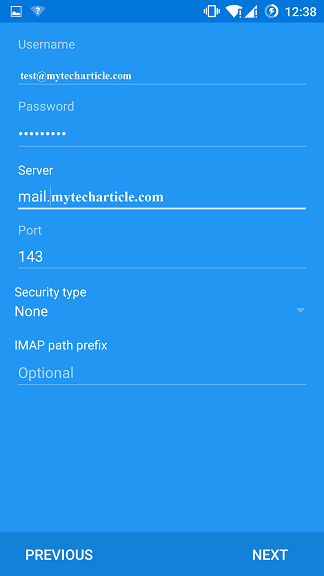
6.In Next window will appear with the SMTP Server configuration for outgoing mail authentication.
SMTP server : mail.domainname (ex: mail.mytecharticle.com)
Port : Based on email providers it will be 25 or 26
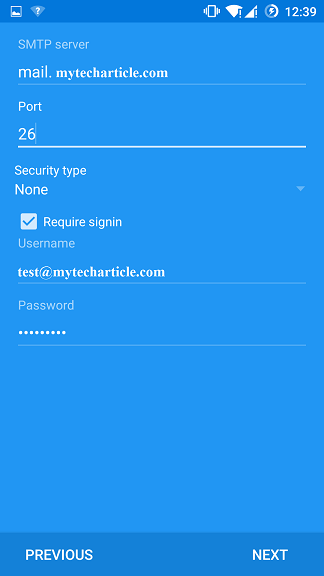
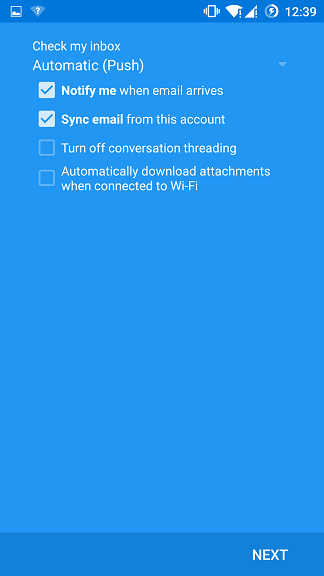
7.Need to update the few more settings for Check my inbox
Automatic (Push)
Notify me when email arrives – enable
Sync email from this account – enable
Remaining options are optional based on your choice.
8.First time it will open the direct Inbox and simple Refresh it automatically inbox mails will download. Beside inbox you can choose the different option to jump into sent or spam folders too.
Tags:webmail,mail configurations. Andriod ,Smartphone, mail settings, mytechaticle, mail exchange, mobile outlook






Add Comment