


How To Install And Configure Tomcat In Windows
Description:
Tomcat is one of HTTP application run on TCP/IP.In general HTTP request will work on specified port but in
the application we can define port number between 1024-65535 range.According to that we have to change
configuration in tomcat support .xml files.
Steps:
– Log in to the serve using administrator details.
– Now download Tomcat from the following URL,
http://tomcat.apache.org
– Download .tar file or .Zip file.Extract the files in to the specified directory.
ex:c:/apache-tomcat-8.0
– Rename the director with the simple name.ex:tomcat8
– Verify the java installation in the server.If it is not installed install Java JDK.
– After Java installation check the JAVA home path using below command from command prompt.
>set JAVA_HOME
Environment variable JAVA_HOME not defined

– Java home path is not defined.Copy Java JDK installation path.Now open My Computer properties.And click
on Advanced system settings.
– In New windows system Properties will open select Environment Variables.
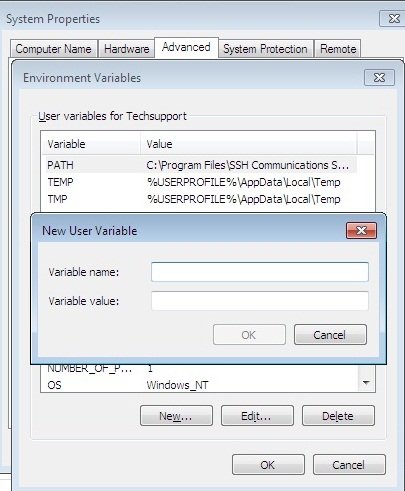
– If Java path is defined change the value to JAVA JDK installed path.If not defined click on New.
– Give the Variable name as JAVA_HOME and Variable Value is JDK path.(c:\Program Files\Java\jdk1.7.0_).
– Now reopen Command prompt and enter the below Command.
> set JAVA_HOME
JAVA_HOME=c:\Program Files\Java\jdk1.7.0_
– Tomcat configuration should be change mention in the below,
– Go to Tomcat directory and open conf folder.
– Using Text editor(Notepad ++,Notepad) open server.xml file.
– Change Tomcat port number from 8080 to some other like 8989 or 9999 in the file.Check the below lines in server.xml.
<Connector port=”9999” protocol=”HTTP/1.1″
connectionTimeout=”20000″
redirectPort=”8443″ />
– Save the file and open web.xml file.
– Change directory Listing for default servlet.Update listings from false to true and save it.
<init-param>
<param-name>listings</param-name>
<param-value>true</param-value>
</init-param>
<load-on-startup>1</load-on-startup>
</servlet>
– Now open context.xml for modify configuration.find <Context> and change to mentioned below,
<Context reloadable=“true”>
……
</Context>
– Edit tomcat-users.xml.For Tomcat log in from front end need to define user name and password in the file.Add the below lines for user details,
<tomcat-users>
<role rolename=”manager-gui”/>
<user username=”manager” password=”xxxx” roles=”manager-gui”/>
</tomcat-users>
– Start Tomcat service in the server.Go to command prompt and open Tomcat directory and bin folder.
c:\tomcat8\bin
c:\tomcat8\bin>startup
– New console will open and start the services.
– for client log in browser use the following , http://localhost:9999 (or) http://localhost:8080.For external use or access through internet use the public ipaddress.ex:http://xxx.xxx.xxx.xxx:8080 (or) http://xxx.xxx.xxx.xxx:9999.

– After complete the work d’t close the window or d’t logoff.It will split the services.from the command prompt use the shutdown command.
c:\tomcat8\bin>shutdown
Tags:Tomcat,Tomcat versions,Tomcat in Windows,Tomcat configuration,Tomcat Installation,Apache modules,IIS,IIS 7,IIS 7 configuration,Tech articles.


This is perfectly awesome…thankyou!!! 🙂